 Save
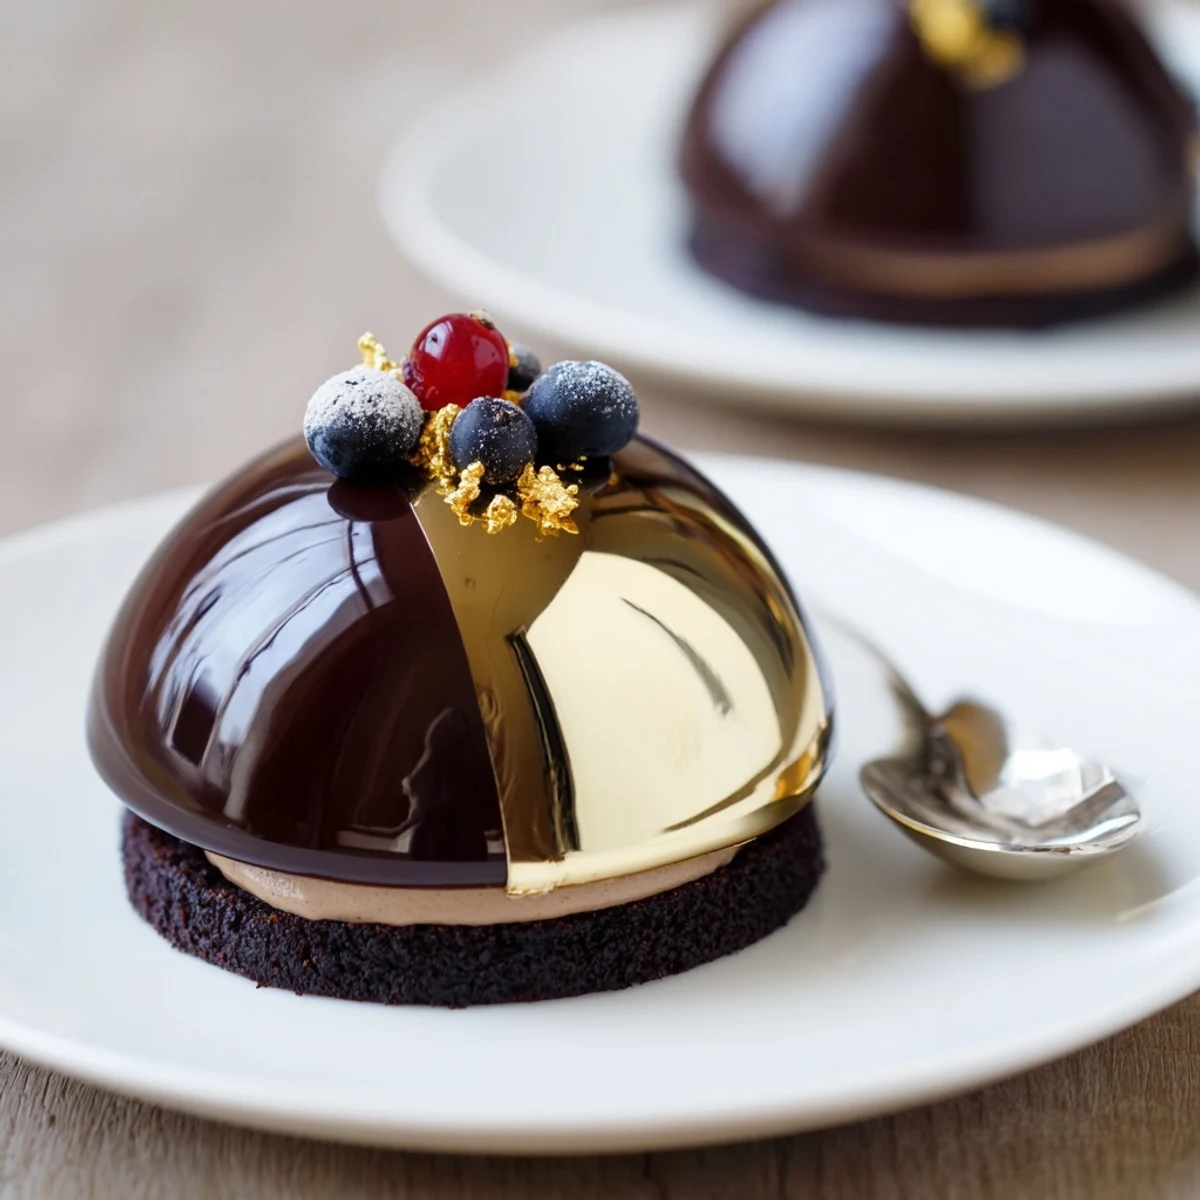
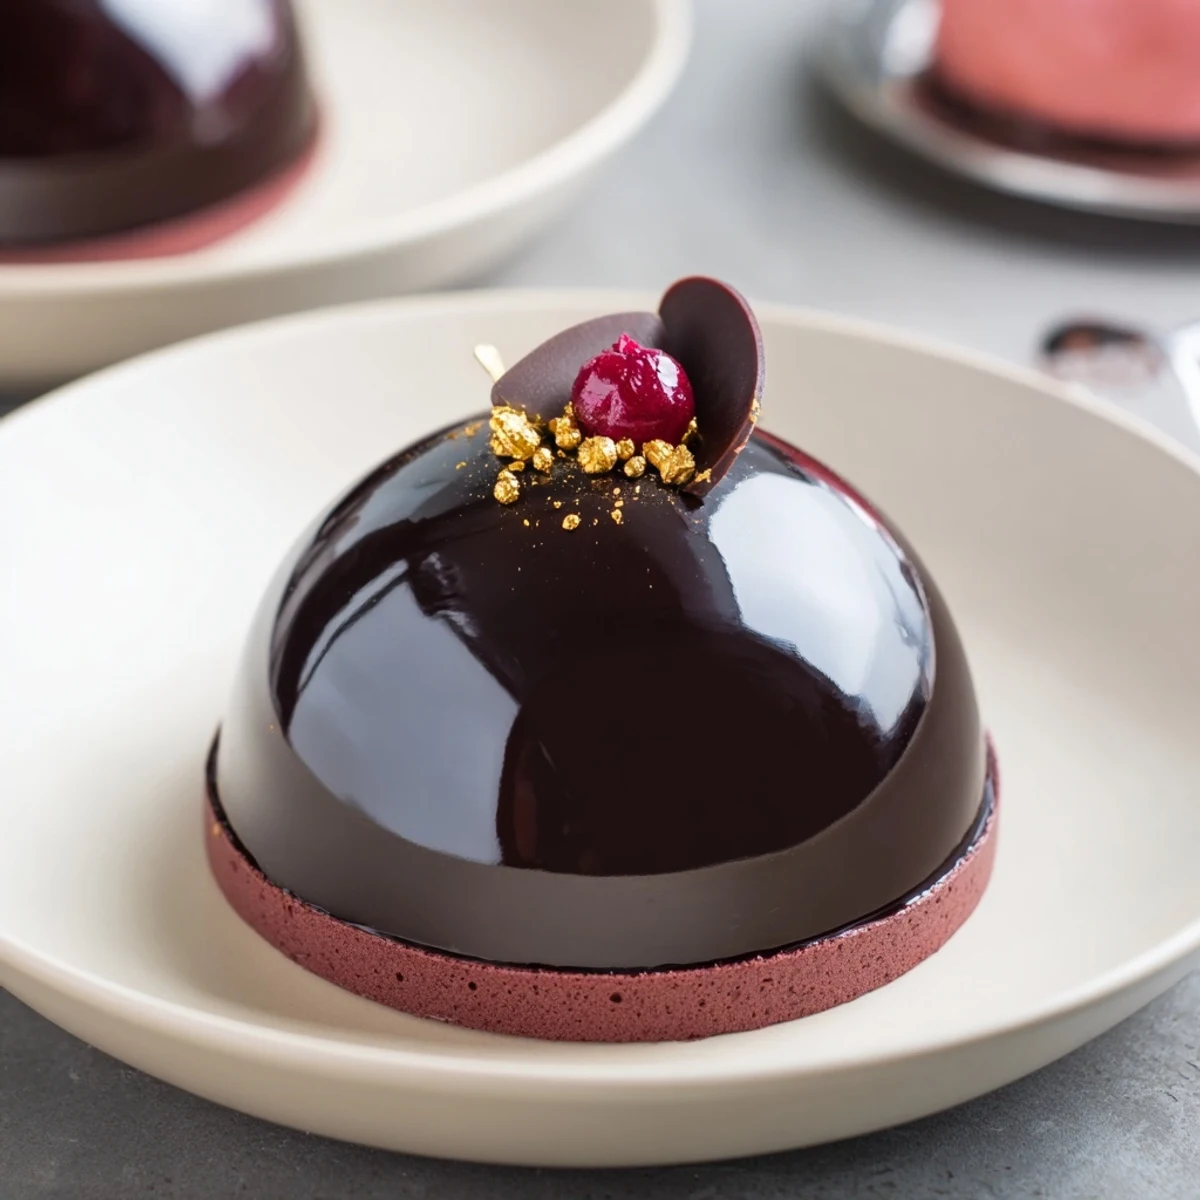
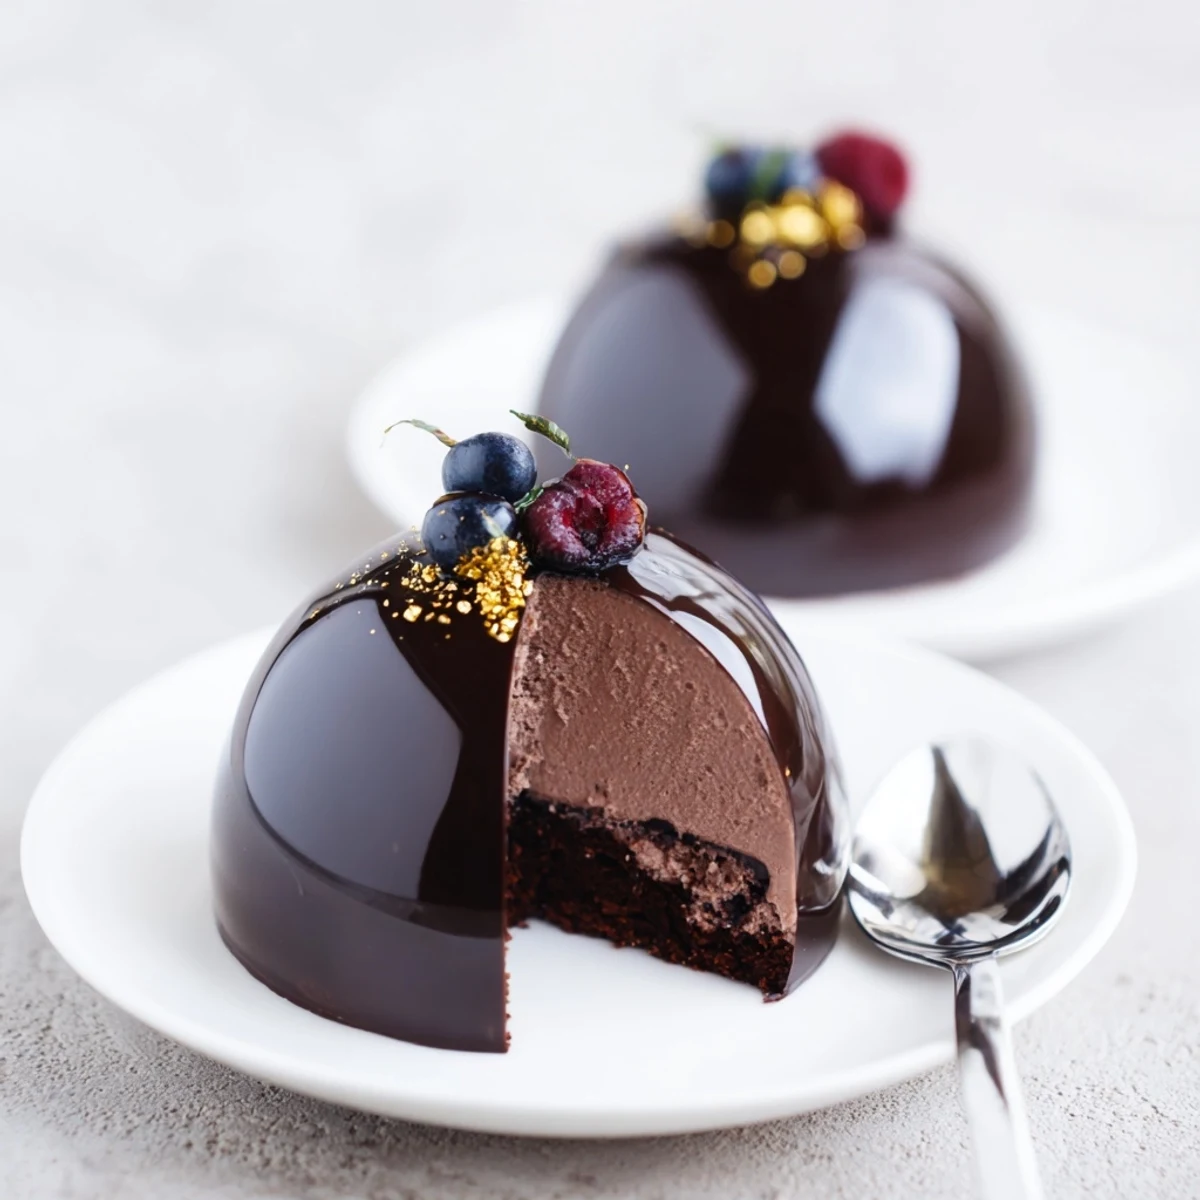
Save This elegant dessert pairs a silky mascarpone mousse with crisp dark chocolate dome shells. Soften gelatin, fold into mascarpone and whipped cream, then pipe into pre-chilled shells and refrigerate until firm (several hours). Prepare a cocoa-based mirror glaze and cool to pouring temperature (≈32°C) before coating each dome. Chill to set, then finish with gold leaf, curls or fresh berries.
There is a particular sound that only comes from glossy chocolate shells tapping against a porcelain plate—the first slice into a dome always makes my heart flutter a little. The first time I attempted these chocolate mascarpone domes, I was listening to jazz on a rainy afternoon, trying to shake off the gloom with a project that promised edible elegance. Plumes of cocoa aroma filled my kitchen while the chocolate shells set, and by the time I unmolded them, I'd grinned like I'd pulled off a minor magic trick. If you crave a show-stopping dessert that feels as much an experience as it is a treat, this one always delivers on anticipation.
Last winter, I brought a batch of these domes to a friend’s milestone birthday, and they sparked giggles and smartphone photos before dinner even started. I still remember one friend lightly tapping a dome as if determining if it was real—and the joyful surprise when the shell gave way to silky mousse. It turned a regular dessert moment into instant celebration. The memory of us crowding around, eyes wide and hands sticky with chocolate, makes this recipe a personal secret weapon for special nights.
Ingredients
- Dark chocolate (at least 60 percent cocoa): Use the best quality you can find, as it forms the crisp, glossy shell—shiny chocolate makes the domes stunning and easy to unmold.
- Mascarpone cheese: This cheese brings rich, subtle tang and a creamy mousse—always keep it cold so the mixture whips up light with no lumps.
- Heavy cream: Whipping cream should be straight from the fridge for proper loft; soft peaks are your friend here, not stiff ones.
- Powdered sugar: Sifting ensures zero lumps and a whisper of sweetness.
- Vanilla bean paste or extract: The aroma infuses the mousse, and once I started using real vanilla paste, I never looked back.
- Gelatin (sheets or powdered): This guarantees structure to the mousse and glossy glaze—bloom it patiently for no chewy bits.
- Water: Essential for blooming gelatin and making the glaze; use cold for gelatin, hot for the syrup step.
- Sugar: Dissolved with water and cream to bring shine and sweetness to the glaze.
- Cocoa powder, sifted: Gives depth and gorgeous color; sifting prevents stubborn lumps in the glaze.
- Decoration (gold leaf, curls, berries): These take the domes from delicious to dazzling—choose colors that contrast the chocolate.
Instructions
- Melt and Paint the Shells:
- Set your chopped chocolate over barely simmering water, letting the aroma curl up as it melts. Paint or spoon the chocolate inside silicone dome molds, chill, and repeat for sturdy shells before a good 30-minute set in the fridge.
- Whip Up Mascarpone Mousse:
- Bloom the gelatin—give it a soak while you whisk mascarpone, powdered sugar, and vanilla till silky. Whip cream to soft peaks, feather it in gently, melt your gelatin, then fold it in smoothly—no lumps allowed.
- Fill the Domes:
- Spooning or piping mousse into the chocolate shells feels satisfyingly decadent; I always smooth the tops with the back of a spoon before chilling for 3 hours (patience pays off here).
- Release Your Domes:
- Pop the set domes out of their molds onto a wire rack with a steady hand, catching the first moment they shine in the kitchen light.
- Make Glossy Mirror Glaze:
- Bloom your gelatin once more, then gently heat water, sugar, cream, and cocoa, whisking until seamless. Cool to the perfect pourable temperature, stir in the softened gelatin, and wait for that magical syrupy texture.
- Pour and Decorate:
- Pour the glossy glaze in generous circles over each dome—it drapes and glistens and feels like lacquer work. Dress with gold leaf, chocolate curls, or berries, then chill to set before serving your edible jewels.
 Save
Save For me, this dessert crystallized as more than a recipe the day I watched my mother—who usually claims chocolate is overrated—close her eyes on the first bite, utterly silent except for the gentle clink of her fork. That moment marked the transformation of a fussy-looking project into a memory shared across the table.
Mastering Temperatures
Having patience with temperature changes makes or breaks the recipe—chocolate that’s too hot melts molds, while mousse that’s too cold won’t fold smoothly. Investing in an inexpensive kitchen thermometer spared me at least two batches of ruined glaze, and now I never glaze in a hurry. Watching the mirror glaze flow slowly reminded me that desserts are as much about rhythm as they are about taste.
Presentation Secrets
I once served these domes scattered with edible gold leaf and tiny wild strawberries; the look of delight on guests’ faces convinced me presentation truly brings the wow effect. Sometimes, I use a thin coffee-soaked sponge base for an extra flavor boost, and just a single berry on top for minimalist elegance. Unexpected contrasts—creamy mousse, brittle shell, juicy fruit—keep people talking long after dessert is finished.
Troubleshooting and Final Touches
Glaze drips are inevitable, but a quick swipe with a palette knife or even a clean finger tidies things up. Try not to panic if your first shell cracks; patching with a dab of melted chocolate is my go-to rescue act. Remember to keep everything chilled—these domes shine brightest when cool.
- If the mousse seems too firm, let it sit just a minute before spooning it in.
- Store domes uncovered in the fridge for crisp shells.
- Glaze leftovers are perfect on ice cream—save that extra bit!
 Save
Save Whether you’re plating these domes for a party or enjoying one alone with espresso, don’t forget to savor the magic you’ve created. Dessert is fleeting—but the glow of accomplishment lasts far longer than the glaze.
Recipe FAQs
- → What temperature should the mirror glaze be for pouring?
-
Cool the glaze to about 30–34°C (86–93°F) before pouring. Too hot will thin the glaze and melt the mousse; too cool yields a thick, uneven coat.
- → How do I make sturdier chocolate shells?
-
Apply two or three layers of tempered dark chocolate, chilling briefly between coats. Ensure molds are fully chilled before unmolding to help the shells release cleanly.
- → Can I replace gelatin for a vegetarian set?
-
Use a plant-based gelling agent like agar-agar, but adjust quantities and technique: agar sets firmer and faster, so dissolve and cool carefully before folding into the mousse. Texture will differ slightly from gelatin.
- → How long should domes chill before glazing?
-
Chill domes at least 3 hours, preferably overnight, so the mousse firms fully and the shells are cold. Cold domes help the glaze set quickly and give a smooth finish.
- → Why might my mirror glaze be lumpy?
-
Lumps often come from poorly sifted cocoa or insufficient whisking while heating. Sift cocoa, whisk until smooth, and strain the glaze if needed. Avoid boiling after adding gelatin to preserve gloss.
- → Any tips for unmolding without breaking the domes?
-
Gently flex silicone molds and tap the base while supporting each dome on a flat surface. If shells stick, chill a bit longer or warm the mold briefly with your hands to release them.
